
Hello I know its been forever! But I believe Kristi and I have gone our different way in the crafting world! :) Still good friends though! Shes the bestest!
I just wanted everyone to know I opened a new blog and Im gonna try and keep up with it!
Please come and visit me at http://cheezenwhinecrafting.blogspot.com/
Thanks and have a great day!
Chrissy
Monday, September 27, 2010
Monday, May 10, 2010
Some more Freebies!
Hi again, I hope you all had a wonderful Mothers Day. It was a beautiful day here and I bumbed around the house all day, I did absolutely NOTHING! yay! and I enjoyed it!!!
Still haven't had time to scrap and make a project, I am right in the middle of revamping my studio and everything is in that room is where it's not suppose to be! In other words...a HUGE mess!!
Sooo, I thought I'd share another site I just found while blogg hopping...
on this site you will find awsome digi stamps and FREE digi stamp MONDAYS! I like free :)

Hope you enjoy.
Till next time
HUGGENS
Elsa
Sunday, May 9, 2010
Lollipop Flowers

I am just so addicted to making these! They are so simple to make..
All you need is the Sizzix Original Circle Die (the big red die with four circles)
Cut out your 4 circles. I sprayed with Glimmer Mist and crinkled. Let set for a minute. and unfold. Layer, add button or embellishement in center. I added stickles around the edges of 2 layers...thats it! Some cute lollipop flowers for your layouts, card or..the possiblilities are endless!!
Enjoy
Kristi
Saturday, May 8, 2010
Winners for National Scrapbook Day giveaways!
Here are the winners of the Giveaways we had for National Scrapbook Day!
Congrats! Please send your mailing address to: ourinspirationstation@yahoo.com
Winner of the scissors charm- **treefrog**
**Treefrog** said...
You truly are amazing! You always come up with the cutest ideas! I love it. TFS
Winner of Detailing pens- Beth
Beth Said
Very nice work...the details are fab!
Winner of Lollipop Flower Pin- mshady
mshady said
I love this. I have not tried any of the flowers I have been seeing all over the place. I need to try. Sure they will not look this great but worth a try.
Congrats To all of you!!
Thursday, May 6, 2010
Metal coloring oh my!
Hi! Another cloudy beachless day for me, sooo I'm gonna share this tid bit of info with ya'all'<- that there is mex-tex gone countree! lol
Ok anyway...I don't always like my charms to have that silvery color, I would like them to match my projects, but it would cost me an arm and a lecture from my Hubby if I went and bought all the metal stains I needed to match my enormous paper collection! Sooo, being that I own a Nail Salon (Salon Mistique convientlly located in beautiful Flor... oopps not a commercial huh?) lol needless to say I have tons of nail polish. Nail polish is inexpensive and comes in tons of colors! yay! (Stop me if you know about this already ok?) but here is what I do...

This sun face has some dark stain built into it.


After he is all dry, I apply GLOSSY ACCENTS (it seals the charm making it durable)... I love that stuff , I do truly believe they should sell it by the gallon! and then I use the charm on my projects. This little guy I used on one of my doodles "Fernando" you can see more detailed pictures of "Fernando" on my blog over at
here is a preview... the sun charm is around the neck, it matches perfectly!...too cute!
(Fernando will be a digi stamp as soon as I can figure out how to do instant download.)

Hope you can use this...THANKS for stopping by and
God Bless...
HUGGS
Elsa
Tuesday, May 4, 2010
Hello all I'm the newbie!
Hello! My name is Elsa and I am so excited to be part of this DT. I just got the invite today from Chrissy...(Thanks girl). I live in Florida, right by the Gulf (we are all worried about that dang spill right now, if you have never seen the beaches in Floirda your missing something truly beautiful and the oil can sure ruin this beautiful area!) I've been in Florida for 25 years now, original I'm from Texas but I love it here. I have two daughters, (Krystal and Brandi) and a 2 grandsons and 1 granddaughter. I don't sleep much, I am part Adams, so odds are most of my entries will be late at nght :)~ I love love love Chocolate, hate frogs and love the sun. I just read Greenbeans, profile and ummm was surprised that she hates chocolate! a first for me. lol
Anyway I don't have a project to share with you all today but I have a couple of sights to share that might help you all in the pocketbook.
For those of you who actually use your Cricut and have the SCAL software, you can get cool and FREE svg files!! They have lots and lots to chose from, and if you skip and hop over there and join their email list they will send you "the free svg of the day" straight to your email! Did I mention they were FREE?!? Go to
http://svgcuts.com/blog/
Here is one I just loved and have used it many times.

You can find this here:
And for those of you that use the Sizzix products, if you visit their webpage and subscribe to their email list, every Tuesday they will send you a code for up to 60% off on selected items. I purchased almost all my Hello Kitty dies for about $1.50 each!!!
Visit them at
Well I will try to have a project for you all next time.
Thanks for visiting and check back soon!
Huggs
Elsa
Just a Few Paper Designs
watering can box
Morning! Here is a little watering can box I found over at SCS. Super easy to make.
Heres the LINK
We also will have a new designer joining us... maybe today! Her name is Elsa!
Well I am off to get my little ones up for school. Yeah its that time again! lol


Have a great day!!
Chrissy
Heres the LINK
We also will have a new designer joining us... maybe today! Her name is Elsa!
Well I am off to get my little ones up for school. Yeah its that time again! lol


Have a great day!!
Chrissy
Monday, May 3, 2010
Baby Blessings Jar


This would be a great gift to give at a Baby Shower.. You could write a bunch of blessing or inpsirational quotes for mom to read or I made it so Mom & Dad can pull a strip of paper of the side and write down there own little blessing...Like she smiled today, Grandpa held her today, she slept all night....simple things that you want to remember and show her when she is older!
Baby Blessing was cut from Wild Card Cartridge using Pink Vinyl. Strips were cut 1 x 3 and pinned to the ribbon with a safety pin.
Enjoy!
Kristi
Sunday, May 2, 2010
T-Lite Birthday Cake!

Happy Birthday to me!! LOL Today is my Birthday and I made myself a cake! LOL
This was so fun and easy to make!
You need a t-lite
Scallop Circle (approx 1 1/2 depending on your t-lite)
I used vinyl for the outside but you could use paper also, add ribbon.
And decorate!! So cute!
Enjoy
Kristi
Kristi's Birthday
Its Kristi's Birthday today!!!! Happy Birthday Kristi! I hope you have a great day!!!!
Saturday, May 1, 2010
We will announce the winners...
for any of the giveaways next Saturday.. so we can give everybody a chance to enter!
Hope everyone enjoyed our projects and had a fantastic Day!!!
A CHALKBOARD THAT'S TUTU CUTE!....
well...this is my last project...insert tears here...let me just say that i had a blast joining these ladies!...and i'm blown away with what everyone came up!...such talent over here!...thanks for having me and letting me join in the festivities!...
so...this one started out as one thing...and ended up as something totally different...was meant to display a couple of photos...but since i couldn't dig up any of my pics (that's right...i was a ballerina for almost 18 years!)...i quickly decided that some chalkboard paint would be a super cool alternative!...anywho..using a 8 X 10 canvas painted...then adding some ribbon and tulle...makes for one tutu cute chalkboard!...

so...this one started out as one thing...and ended up as something totally different...was meant to display a couple of photos...but since i couldn't dig up any of my pics (that's right...i was a ballerina for almost 18 years!)...i quickly decided that some chalkboard paint would be a super cool alternative!...anywho..using a 8 X 10 canvas painted...then adding some ribbon and tulle...makes for one tutu cute chalkboard!...

Mermaid box
Mini box
This box measures 4x4x1 when complete
The stamp is another digital from cc's designs
Box instructions:
Cardstock or heavy patterned paper cut @ 6x11
6" side score @ 1" flip and score @ 1" again
11" side score @ 1,5,6 and 10
Along the long sides cut each 1" score line to make tabs
Fold the box together.
The circle and scallop was also the cuttlebug and spellbinders
I added some bling and ribbon as well.

side view

Inside of box

Have a scrappin day!!!
Chrissy
Triangle Photo Display!


You are my Sunshine Photo Display!
This would be great for showcasing pictures of your Sunshine or Sonshine!
I used cheap throwaway coasters I found at Joanns in the dollar bins
Punched 2 holes on each end and tied together with ribbon, add your photo mats and your saying..I used pooh font and doodlecharms!
A simple, fun project! This would make a great gift!
Enjoy
Kristi
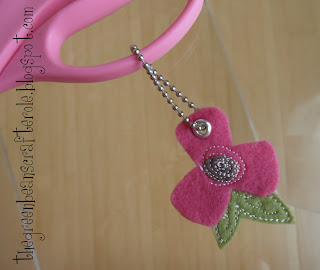
SCISSORS WITH STYLE...
ok...i know it's kindy tricky keeping track of your stuff at swarms and crops...so what better way than to snazz up you scissors?...then...from across a room you'll be able to yell "hands off...those are my scissors!"...'cause you'll know they're yours!...lol...anywho...used the super cute stampin up sweet pea felt flowers...attached the leaf with fabric tac...used the handy dandy crop a dile to punch a 1/8" hole...grabbed an eyelet and set it...then...got these beaded keychains in the leather section at m's...how perfect to attach the flower with?...now you got some scissors with as much style as you!...
did i forget to mention i'll be giving one of these away?...that's right!...it could be yours!...just leave a comment below and we'll pick a winner!...
did i forget to mention i'll be giving one of these away?...that's right!...it could be yours!...just leave a comment below and we'll pick a winner!...

turtle treat boxes
OK post # 2 for me!
These are just tooo darn easy!
to make the box:
cardstock or heavy patterned paper 4 1/4 x 5 1/2
add tacky tape ( double sided tape ) to 3 sides of the piece of paper ( 1 short side and 2 long )
peel off tape backing
Roll the short sides together making it look like a toilet paper holder
squeeze the bottom together
fill with your favorite treats
then squeeze the opposite side together going the other direction
I used a paper crimper on the ends ( found at Michaels )
the stamp used is made by Inky antics colored in with copics
I used the cuttlebug and the spellbinder for the circle and scallop

close up of the turtle

These are for sale in my online store if you are interested!
SHM scrapbooking
see ya in a few hours!! Up next hour green bean again!
Chrissy
Social Butterfly Layout


I started this project for something a few weeks ago and I finished it today so I could share with you...I hope it inpsires you today!!
I don't have the specific details for this layout, but I can list cartridges used.
Everyday Paper Dolls
Plantin Schoolbook
Stamping Solutions
Don't forget Peachy Keen Face stamps!! So awesome!!~
I used a Signo white Uniball pen for details...I LOVE that pen!
Leave a comment on this post and the winner will recieve my favorite 2 pens for detailing!
A signo White uniball and .005 Black Micron
Enjoy!
Kristi
LOOPY FOR LOLLIES...
so...maybe you're thinking i'm lost or something...well...i'm not!...hee hee...the ladies over here asked me to join 'em today to celebrate national scrapbooking day!...and i had to just had to jump on it!...well...i must admit that i'm not much of a scrapbooker...so this was a challenge for me...but...got the wheels working and came up with some ideas that might work...kinda going in more of an embellishment route...but what are pages without 'em?...lol...anywho...took the lollipop flower idea and give it a spin...had some sleeves from a tee that i had cut off (wanted to show off my guns...lol) and loved the material...ended up grabbing my sizzix circles #2 die and cut out 2 sets...layered 'em on top of each other...doing the off center thing...took a thread and needle...and tacked all the layers together...found a cute button and slapped 'er on there...cut a 1" circle out of chipboard (aka cereal box) and super glued to the flower...then super glued a tack pin to the circle...and taa dah!...this super cute flower pin...but you could leave the pin off...and have one heck of a cute embellie!...

now this little guy below is going to need a home!...all you need to do is leave a comment and it could be yours!...


now this little guy below is going to need a home!...all you need to do is leave a comment and it could be yours!...

girly hersheys box
Happy Scrapbook day!!!
Here I have a Hershey's chocolate box!
I used a digital stamp from Pink Cat Studio
Measurements for the box:
Lid: 5 3/4 x 6 7/16 score @ 9/16, 2 15/16, 3 1/2, 5 7/8
Bottom: 3 1/4 x 6 3/4 score @ 1/2 inch on each side cut slits on long side


Have a Scrappy Day!
Chrissy
Ps... Check back every hour!!!
Dino-mite clothespin magnets

These cute little clothespin magnets were super simple and easy to make! Perfect for displaying pics, projects or those test papers with super grades!!
For this project you will need:
Clothes Pins
Acrylic Paint
Brushes
Glitter
Glue
Cartridge of your choice ( I used Create a Critter)
Paint clothes pins. After they are dry do a light thin coat on the front of of clothespins.
Sprinkle Glitter
Here is the cuts I used:
Dino's were cut at 1 3/4 "
Scallop was cut at 2"
Thats it super quick! Enjoy!
Kristi
Friday, April 30, 2010
Fun*FUN*Fun
Don't forget to stop by tomorrow..we will be posting projects starting at 10:00 am...visit all day for fun projects and giveaways!
Tuesday, April 27, 2010
Don't Forget...
We are going to be posting scrappin and craft projects, ideas and giveaways throughout the day on Saturday!! Be sure to visit!
The one and only GREENBEAN from the Cricut Messageboard will be a guest here on Our Inspiration Station stop by and she what awesome projects she has up her creative sleeve!!
Saturday, April 24, 2010
Strawberry lollipop holders
Helloooooooooo! :) I made these this week to put up for sale in my store. Such a sweet treat! They hold the dum dum lollipops. Wanna see more items for sale?? Click on the links below!
SHM Scrapbooking
Chrissy's eBay items
Thanks for taking a peek!
Chrissy

SHM Scrapbooking
Chrissy's eBay items
Thanks for taking a peek!
Chrissy

National Scrapbook Day..
We are planning some fun things! Check in here on May 1st!
Sign up to follow and dont miss out! Tell your friends!
Sign up to follow and dont miss out! Tell your friends!
Turtle Baby Announcement!!
Using the ever so *CUTE* & *ADORABLE* Create a Critter cartridge! This is a must have! It is my favorite cartridge..Love it!!


Kristi
Friday, April 23, 2010
Monday, April 19, 2010
Birdie Paper Pad..with Create A Critter & Glimmer Mist

Hello all! Here I am again using my new favorite cartridge!!
Create A Critter
This note pad was made using a paper pad I bought at the Dollar Tree. There were like 5 cardboard insert seperating the notepad. I took a stack of the notepad in between 2 layers of cardboard and ripped it off the pad (I hope this make sense..its hard to explain in writing..I need to do some videos!) Anyway after tearing it off the pad I had another smaller notepad that had a cardboard cover and back.
I cut "Tweet" from create a critter using vinyl..adhere that to cover and I sprayed with Glimmer Mist to cover area. Remove vinyl. Next I cut my bird from Create A Critter and adhere to cover..add ribbon..and you have a nice little gift!
If you have any questions on this or would like to see a picture of the notepad I used just leave a comment and I will get bak with you!
Thanks
Kristi
Sunday, April 18, 2010
Create A Critter Owl Card!
Well like I have said....I LOVE THIS CARTRIDGE!! (yes, I am that excited about it! LOL)
So expect to see lots from it!
Here is my first project from the cartridge.
If you don't have this already it is a must have!!
Isn't this Owl just 2 cute!

Monday, April 12, 2010
Mini Album!
Hello! I hope this finds you all having a fantabulous Monday! The sun is shining here in PA and it's the perfect temp, too! : ) Since Kristi has been after me to post something... here goes....
This mini was created using old CD's..... that were damaged and/or non-useable in some way..... they make a great surface for covering and altering! To cut the straight edge on the CD's I use a pair of tin-snips that I have had forever! I made a "pattern" for this so I don't have to keep measuring each CD! LOL
Once each CD is covered, I use my BIA to set the holes for the binding wire.... but I don't bind the mini until I'm done decorating each "page" unless I have a really bulky item like the flower on the front page... that had to be the last thing attached to the album!
"faith" is cut from the Home Accents cart
flower is made using 3 flower cuts from George cart
stars were cut from George also


Sunday, April 11, 2010
MPS Color Challenge! Here is my entry!

Summer Party Invite & Treat Box!
I am always up for a challenge! Over at My Pink Stamper her and her Pink Designers have a color challenge posted! The colors to use are Pink, Green & Black! This was a fun challenge! Go check out Robyn and the Pink Designers projects and join in the challenge! visit http://www.mypinkstamper.com/
Friday, April 9, 2010
Ladybug Wall Hanging

Hello, I posted this project on the Cricut MB last night and had alot of request for instructions..so here you go!!
Supplies:
Pooh Cart.
Accent Essentials
Doodlecharms
Home Decor
12X12 sheet acetate
Cardstock..colors of your choice
On page 78 of AE cart. Cut scallop out of acetate @ 9 1/2, then cut scallop frame from paper of your choice (same size). Now for the ladybugs..using doodlecharms cut ladybugs at 3 1/2, 1 3/4 & 1 1/4 (note: I cut the black cardstock out on the blackout feature).
Twigs were cut from Home Decor at 3"
Ladybug Wishes was cut using Pooh Font at 1 1/2.
Ladybug Wishes was cut using Pooh Font at 1 1/2.
Assemble your wall hanging!
Note: I used a black pen for the antennas
Enjoy!
Kristi
Tuesday, April 6, 2010
One for the boys!

Everyone is always talking about wanting more boy theme cartridges and when you think about it you dont see alot of boyish things made.....I have to admit girly stuff is so fun to make!
But I felt a little guilty! LOL So here is my project for the boys! A cute little favor for a birthday party!
Recipe:
Sweet Treats Cartridge
Paper (paper was bought at Hobby Lobby)
Adhesive
Ink
Pop Dots
Glue Dots
On page 54 of the sweet treats cartridge I cut the cupcake holder using fit to page feature..it cut two at 5 1/2. Assemble boxes.
Next on page 53 I cut the scallop at 2" and then 3 scallops at 1 1/2 on the shadow feature.
Ink edges.
Cut a strip of paper 1 x 8 and adhere to inside of box.
I cut vehicles from the paper and adhered them to the 1 1/2 scallop. Using a glue dot I placed the scallops on a pixie stick and placed them in the box...I did use a mini glue dot to hold the pixie sticks up (placed on back of handle).
Fill box with more candy and you have the perfect treat!
Enjoy!
Kristi
Monday, April 5, 2010
what were we thinking card
Hello!! I made another card with another digital stamp from Bugaboo. Did I tell you I love these??? Oooo yes I did! Oh and again the Berry Sweet paper.
I also made an album that I listed on ebay that I made with some stamps from Bugaboo too.
Wanna take a peek at it?? Click HERE to see what I have listed there.

I do have something in store for you guys tomorrow to make... so stay tuned.
Im also thinking of another giveaway!!!!LOL just an excuse for me to go shopping! Maybe this time we'll do a blog hop.
Anyways... I have to go to bed.... Ive been under the weather. Blah...
Have a great night!
Chrissy
Sunday, April 4, 2010

Friday, April 2, 2010
Belated Birthday card
I am such a slacker!!! Shame on me!
Ok ok... I have however been crafting my butt off and I do have some items in store for ya =)
I came across these cute digi stamps over at Bugaboo stamps. Oooo I love them all!
I printed them on my computer and colored them in with my copics.
The flowers are made by K & Company too
Kristi inspired me with her last give away... so I had to dig out my Berry Sweet paper and do something with them instead of hoarding them. Im gonna end up on that show Hoarders from all the stuff I keep!
I simply printed a saying on my computer as well.
The one I used goes with the fact she has a sucker in her hand. I used Diamond Glaze on it to make it shiny.


Have a great night! I hope you are able to enjoy the weather like Im gonna do tomorrow!
Chrissy
Monday, March 29, 2010
Bunny Skittles Candy Holder
Hello. Just wanted to share my project I made for the My Pink Stampers Pink Designers Design Team Call.
I wasnt selected, but I would like to say congrats to Flowerdisco & the other 7 designers chosen!!!!!!
These cute little Skittles holders are going to be given to my Nieces and Nephews on Easter!!
Have a great day!
Kristi


Subscribe to:
Posts (Atom)


